
Phone Address-Book to Labels - Baixar APK para Android | Aptoide
Descrição do Phone Address-Book to Labels
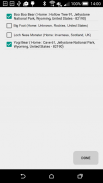
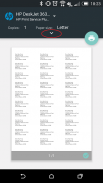
Print addresses from your phonebook directly to labels in a printer.
Benefits:
==========
* Reach out to your customers
* A mass mailing solution for entrepreneurs
* Send marketing material, invoices, invitations, greetings and introductions
Print layout:
=========
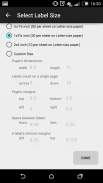
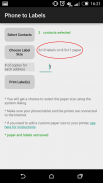
The app allows you to fully customize page-size, labels per page, and even margins within individual labels.
It has 3 preset layouts, but please note that each printer is different. So, a set of margins that work fine on one printer, may appear slightly different on another printer, and you may need to adjust these using the 'Custom' options.
Try to print your labels on a normal paper, hold it (with your labels sheet) up against the light to check for alignment.
It may take a few tries to get the correct alignment, especially for smaller labels.
(All dimensions are in inches).
Setup instructions:
==============
Google's Cloud Print is used behind the scene, therefore, if you have not set it up, here are the instructions for your convenience:
To setup Google Cloud Print, you will need a computer with an internet connection, and to print from the phone, you will need WiFi or a data plan on your Android phone.
Step 1: Make sure you are logged in to your google account on your Chrome browser
a) You need to install Chrome Browser and log in using your Google id (Google search: "how to log into chrome")
b) You must have the the same Google id on your Android phone
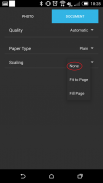
Step 2: Make sure your printer supports the paper size that you want to print on.
a) In Microsoft Windows, go to "Devices & Printers" in the Control Panel
b) Right click on your printer, and choose "Printing Preferences"
c) Under "Paper/Quality", (or "Adobe PDF Settings" if printing to a file), check the list of Paper sizes, if the size is not listed, click on the "Custom" button, (or "Add" button if printing to a file), and add the size.
Step 3: Enable Google Cloud Printing
a) Open Google Chrome and go to Settings
b) Click "Show Advanced Settings..."
c) Scroll to the end and make sure that the checkbox "Continue running backgroHeist Stakesund apps" is checked
d) Under "Google Cloud Print", click the "Manage" button
e) Under "Classic printers", click on "Add printers" button
f) Choose the printer(s) that you want to print your labels on, and click on "Add Printer(s)" button
g) (optional) if you want to share this printer with friends, family members, or colleagues, now is your chance. Click on "Manage" button next to the printer that you just added under "My Devices"
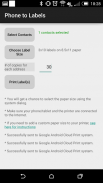
That's it, you are all set to use your phone to print address labels.
Since, this is a new app, your feedback is important to us. Also, do drop us a line if you would like to see additional features.
Also, if you think of anyone who would find this app useful, please ask them to try it out.


